Run DeepSeek R1 privately for your organization
In the past couple weeks Deepseek R1 has taken the AI industry by storm, with its mind blowing Chain of Thought and Extensive Reasoning abilities(don't forget the cheap price). Many are wondering how they can let everyone in their organization use Deepseek without anyone stealing their data(*cough *cough China).
vLLM
What is vLLM?
So how do we harness this Chinese AI beast securely? Lets talks about our digital bouncer - vLLM.
Why are we using vLLM?
- Deploying models is generally complex, expensive and time consuming
- It is open source and normal techniques of serving models are expensive in Time and Resources
- Addresses vendor lock-in and cost issues associated with cloud platforms like AWS SageMaker and Google Cloud.
vLLM is a cutting-edge framework developed at UC Berkeley designed to optimize large language model inference and serving. It simplifies the deployment and scaling of AI models, making them more accessible for real-world applications. Here are some key features that make vLLM stand out:
State-of-the-art throughput: Delivers leading performance in LLM serving, ensuring fast and efficient processing. It chews through prompts like a body builder at a buffet.
HuggingFace integration: Seamlessly access and deploy popular open-source models from the HuggingFace ecosystem. (In our case DeepSeek R1)
Flexible decoding: Supports advanced techniques like parallel sampling and beam search for diverse use cases.
Quantization: Reduces model size and latency with minimal accuracy loss, enabling faster inference and lower resource requirements
PagedAttention: Efficient memory management for large models
vLLM addresses critical challenges in LLM deployment, such as high computational costs and scalability, making it a powerful tool for AI practitioners and companies wanting to serve models on premise.
vLLM also allows you to serve modals with different modalities such a Text, Image, Video and Audio which includes Vision Language Models. Imagine an AI application that you can join your meetings and have it take notes for you, all private and secure.
Why not Ollama 🤓☝️
Ollama is another popular way to serve LLMs BUT it serves a different purpose than vLLM. Ollama prioritizes local inference with small setup, making it ideal for users on their personal machines.
Ollama is also known as a llama.cpp wrapper, which I recommend to use as your inference engine if you are serving models through CPU only. llama.cpp does not support tensor parallelism which is crucial for LLM serving to large audiences with GPUs, but it is a great option for resource contained environments
Tensor parallelism is important(so is pipeline parallelism but that's a different story). Tensor parallelism is when you have 2, 4, 8, 16, etc GPUs 2^n and it allows for execution over different layers and GPUs at the same time or in basic terms it evely distributes the neural network evenly across GPUs
vLLM focuses on high performance inference and scalability, designed for production grade AI deployments, serving to many through an API. It requires more technical setup as well.
In realtime applications, Ollama typically shows lower latency but vLLM excels in batch processing and handling multiple simultaneous requests.
The Code 🧑💻
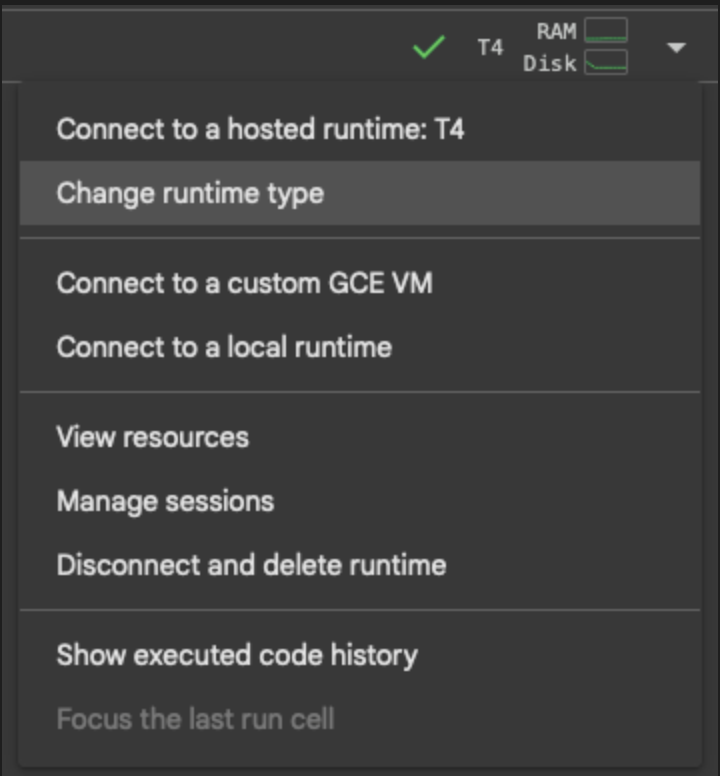
First lets open up a new Google Colab. On the top right change the runtime to a T4 GPU.

Google colab comes installed with tensorflow but we do not need that so lets uninstall it while installing our packages
!pip uninstall -y torch vllm tensorflow tensorflow-gpu

!pip install torch==2.5.1 --extra-index-url https://download.pytorch.org/whl/cu121

!pip install vllm==0.6.6 openai
Run this is your first block and wait a couple seconds for everything to run.
After that we will serve using vllm. For this example we will be running the distilled DeepSeek Qwen 1.5 as it will fit in with the T4s VRAM with some tweaks.
!nohup vllm serve deepseek-ai/DeepSeek-R1-Distill-Qwen-1.5B \

--dtype half \

--tensor-parallel-size 1 \

--max-model-len 4096 \

--gpu-memory-utilization 0.9 \

--swap-space 4 \

--enforce-eager \

--api-key chinamodelgood &
You can keep the api-key empty, but since we are using a openAI api to chat with it we want to keep it running in the background in colab. To accomplish this we use nohup and & on the end of the code block but if you running locally you can remove those.
--dtype refers to the models weights. We are using half in order to reduce the memory usage and speed up the computation. Instead of 32-bit precision we will be using 16-bit. This is useful for GPUs like T4 as it has a limited VRAM of 16 GBs.
--tensor parallel-size is set to 1 to let vLLM know we only have 1 GPU to use. Tensor parallelism is used to split the model across multiple GPUs. This helps with memory efficiency, latency and scalability for larger models.
--max-model-len is allocating enough memory to handle upto 4096 tokens. Think of this as the context window.
--gpu-memory-utilization sets the GPU usages limit. This ensures the model uses most of the memory(90%) without exceeding it, which can cause errors.
--swap-space 4 allocates 4 GB of swap space on the disk. If the GPU runs out of memory it will offload some data to the disk, useful for handling large model or sequences
--enforce-eager forces the model in eager execution mode, which allows for easier debugging and development. I would remove this before merging to production
--api-key you can leave this empty or whatever you want, I just put chinamodelgood(it is)
After running this code, wait a couple minutes, go spend time with your wife(thats what I did). Dont take too long as google colab will time out. Check the nohap file in your files ![[Screenshot 2025-02-01 at 1.40.16 PM.png]] At the end of the file you will get this information showing the server is up and running
INFO:     Started server process [7774]
INFO:     Waiting for application startup.
INFO:     Application startup complete.
INFO:     Uvicorn running on http://0.0.0.0:8000 (Press CTRL+C to quit)
You can test this by curling the the API
!curl http://localhost:8000/v1
and should get this response if you setup an API key
{"error":"Unauthorized"}
Below is the last cell to run, run this and chat with Deepseek. Replace the content with whatever you want.
from openai import OpenAI

client = OpenAI(

base_url="http://localhost:8000/v1",

api_key="chinamodelgood"

)

completion = client.chat.completions.create(

model="deepseek-ai/DeepSeek-R1-Distill-Qwen-1.5B",

messages=[{"role": "user", "content": "what is deepseek and what is its goal for being open source"}],

temperature=0.7,

max_tokens=1000

)

print(completion.choices[0].message.content)
Next steps ➡️
This is a barebones framework on how to get started with vLLM. To improve this you can do the following:
Use Quantization
Quantization models are models that are reduces significantly in size but the performance only drops off up to 5%. Its also allows for faster inference times and more efficient memory usage(great for less powerful hardware).
When to Avoid Quantization ⚠️
1.Research requiring maximum model accuracy
2.Complex mathematical computations where precision is crucial
3.Using custom models without proper quantization support, testing and validation
For most production use cases (chat, summarization, RAG), the benefits of quantization far outweigh the small accuracy tradeoffs. Always A/B test quantized vs original models for your specific workload!
Add streaming
To chat continuously, introduce streaming with stream=True.
If you made it this far, that means you are actually interested in learning. Below is a code snippet to continously chat with Deepseek.
import os
from openai import OpenAI
import time

# Initialize client for vLLM server
client = OpenAI(
    base_url="http://localhost:8000/v1",
    api_key="chinamodelgood"
)

def stream_with_cot(prompt):
    """Stream response with visible chain of thought"""
    response = client.chat.completions.create(
        model="deepseek-ai/DeepSeek-R1-Distill-Qwen-1.5B",
        messages=[
            {"role": "system", "content": "Think step-by-step. First explain your reasoning, then provide the final answer. Always begin with 'Let me think...'"},
            {"role": "user", "content": prompt}
        ],
        temperature=0.7,
        max_tokens=500,
        stream=True
    )

    full_response = []
    print("\nAssistant: ", end="", flush=True)

    for chunk in response:
        if chunk.choices[0].delta.content:
            token = chunk.choices[0].delta.content

            # Print token immediately for streaming effect
            print(token, end="", flush=True)
            full_response.append(token)

            # Add slight delay to simulate "thinking"
            time.sleep(0.02)

    return ''.join(full_response)

# Example usage
if __name__ == "__main__":
    while True:
        user_input = input("\nYou: ")
        if user_input.lower() in ["exit", "quit"]:
            break

        print("\nThinking...", end="\r")  # Show thinking status
        stream_with_cot(user_input)
        print("\n")  # Add spacing between exchanges
Add Evals
Evaluate and benchmark the performance, such as latency, throughput. Add logging where necessary.